The Gentoo Experience

So it’s been almost a year that I’ve switched to Gentoo Linux, and I’d like to share my experience with those that are curious and want to try it.

Gentoo Linux has a reputation in the Linux community for being the most hardcore Linux distribution there is, second to perhaps “Linux from Scratch”. This reputation is kind of well deserved because a Gentoo Linux user is not your typical Linux user. Essentially a Gentoo Linux user commits to building the entire operating system from scratch, including compiling the Linux kernel and customizing every little detail. Initial installation as a new Gentoo user can take some time as you are learning new things but eventually after you figured everything out it doesn’t take that long.

The main experience with Gentoo is all about learning, you get to learn basically a little bit of everything. If you are the kind of person that usually loses patience when something doesn’t work right, then Gentoo is probably not for you. But on the other hand, if you’re willing to invest the time to learn Gentoo then you will be greatly rewarded.

How will you be rewarded? Well that answer is relative. For example if you use a distribution like Ubuntu and you plugged in a brand new hardware, there’s a chance that the hardware might not work because support for that hardware is not available in the kernel.

Perhaps your hardware requires a special firmware that needs to be downloaded manually and built into the kernel or may be a special FLAG needs to be set in the config file when you are manually compiling the kernel. If you have experience with Gentoo, you probably would be familiar with all these stuff and perhaps can fix the issues on your own for the most part. Thing is compiling the kernel is not as intimidating as it seems, as a Gentoo Linux user you get so used to compiling kernel that it becomes a habit. Sort of like drinking your morning coffee 🙂

Anyway, the point is investing the time in learning Gentoo is worth it. If you are using an Open Source Operating System like Linux, sooner or later you will definitely run into issues. That is just the nature of how things work in the Linux world 🙂

The skills that you pick up along the way as a full time Gentoo user are quite useful, so you can pretty much debug the hardware/software issues on your own without relying too much on the developers for support. Not to mention Gentoo forum is one of the best places for getting support. I’ve seen a lot of distributions for example Arch Linux where the community is very strict, you need to be careful when posting in Arch Linux forums as there’s strict rules related to forum etiquette and in general they are not as friendly to newbies. Compared to that Gentoo Linux community is welcoming and friendly to newbies.

Personally I’ve learned a lot using Gentoo, it made Linux fun for me again. At some point (in my early years as a Linux user) I was kind of disappointed with the Linux community because I was unable to debug and fix my hardware / software issues on distributions like Ubuntu. Filing bug reports and expecting them to get fixed was taking too long and I can’t really blame the developers because  most of the contribution towards Open Source software is done by people on their free time and a lot of them don’t get paid for doing so. As I gained more experience I realized that it’s not actually them to blame but my mindset or to be more specific my lack of knowledge.

Linux is fun, it is exciting for the advanced users who have invested years learning it and have figured everything out. But at the same time it can also be quite frustrating and intimidating for the beginners. It is just a question of how much time you are willing to invest, either way it is worth it.
OpenBSD (First impressions)

BSD’s are operating systems that I always had a keen interest in, mostly because unlike Linux (which comprises of mainly the kernel), BSD’s are developed and distributed as a complete operating system.

What I mean to say is that, GNU/Linux consists of a subset of user land tools (GNU) selected by the distribution developers along with the Linux kernel. Not that it is a bad thing, but the choices made by the developers behind these various distributions such as Ubuntu, Fedora, Manjaro, etc. are reflected on the type of experience a user has since the selection of userland tools that end up in the final operating system may vary. There are also no clear guidelines, no right or wrong way to do something. This is exactly where advanced / meta Linux distributions like Gentoo and Arch Linux fit in, as they hand over the decision making process of what and how to the user.

Anyway what I wanted to talk about today is OpenBSD. Firstly, I have zero experience with any previous BSD operating system. They might be a bit similar to Linux, but they are totally different beasts both with their pros and cons. I’m not here to discuss which is better, I like them both and they have different use cases.

So firstly, the reason for me choosing OpenBSD over the more popular FreeBSD is because the main focus of OpenBSD is security and code correctness. Security is a complex topic, and it is tough to get it right. A lot of the modern operating systems including Linux don’t have many of the advanced system security features enabled by default as distributions like Ubuntu aim to be compatible with as much hardware as possible and enabling such features may cause software & hardware issues as well as a lot of headaches. So just having a Linux distribution like Ubuntu doesn’t necessarily mean that you are safe or secure.

Yes, the advanced security features can be configured if you are an experienced Linux user with strong background in security and using a Linux distribution like Gentoo. But setting up everything to be of top notch security standard and trying to compete directly with OpenBSD is nearly impossible because the code base of the Linux Kernel is huge (Millions of lines of code). As we know, with bigger code base comes vulnerabilities and bugs that can be exploited and so far we have seen many vulnerabilities related to the Linux Kernel emerge over the years, perhaps more is yet to follow.

What I’m trying to get here is that, OpenBSD code base is way smaller than that of Linux and they have a team of dedicated developers who just audit their code base on a regular basis and have been doing that for over a decade. Which means their code base is not only clean and stable, but the whole operating system has been designed from the ground up to be a highly secure system with strong focus on Cryptography as well.

Since I have Gentoo Linux system on my current laptop (which took me like weeks to configure and fine tune everything), I decided to leave it as it is and indulge in OpenBSD by investing as little as possible. An embedded device like Beagle Bone (Black) was naturally the perfect choice as it is reasonably cheap and listed as being supported on the OpenBSD website. What I didn’t know at first was that OpenBSD doesn’t support HDMI on Beagle Bone, so I had to wait a while until I finally bought a ttyl to usb serial cable. What it is and how it works is outside the scope of this post but I learned a lot along the way and was successful at making an OpenBSD install.

Anyway, the most impressive thing that I first realized about OpenBSD was the quality of the man pages. It’s so well written that it puts the Linux man pages to shame. There’s a lot of things that I still have to figure out but I’m learning things one step at a time.

The filesystem used by BSD systems in general is ZFS, which I heard is pretty robust and flexible and used by big companies such as NetFlix to manage thousands of terabytes worth of data. The firewall (PF) is also well known and have been used in a variety of commercial firewall appliances. A lot of other things are still new to me, but OpenBSD package management reminds me of Gentoo as it also gives you the option to compile packages from source besides having binary packages.

Apparently on Beagle Bone there is still no support for binary packages on OpenBSD, and since my SDCard has a limit of 8GB I wasn’t also able to compile anything from source due to the limited capacity. I will write a full review related to OpenBSD once I’ve upgraded to a bigger SDCard and had enough time to mess around with it.

In the mean time, feel free to share your opinion or suggestions related to OpenBSD or Linux in general.

Thanks for reading!


Linux Kernel Module / Hardware Tinkering

When I first got into the Linux world (5-6 years ago), I was a beginner at the time and as usual if something didn’t work out of the box (hardware / software) I used to blame the distro and move on to the next one. I thought it was a “fair” way to do things coming from the Windows world as a Windows user. Given that there were so many distros out there at the time it wasn’t actually a bad move though, but I knew that I’d have to change my mentality if I were to survive in the Linux world.

Slowly, as my experience and skills with Linux matured I realized that I actually enjoyed if things didn’t work and I wanted things to not work as expected so that I can learn how to fix it and make it better.

In most cases just a simple google will work, but if the problem is complex; like something related to hardware perhaps the only way to go about fixing it is by being really persistent. Like the old saying goes “If there’s a will, there’s a way”.

Today I will share some of the little things I’ve learned as a Linux user on how to mess around with kernel modules, learn what features of your hardware are supported by the module and how to disable / enable them.

Mainly I’m documenting this as a self reference in case I forget somethings in the near future.

Okay first of all, if you want to see what hardware you have; which kernel modules are being used by them or in general learn more about what’s happening with your hardware you can use the following commands:

1) lspci -k
2) lshw -short
3) inxi -b
4) lsusb
5) dmesg | grep -i “keyword” //Replace keyword with something specific to your hardware / kernel module

Note that you may have to install inxi and lshw, they’re by default not installed on most distros.

Okay now, let’s say you’ve found the kernel module being used by the hardware you want to debug (Command #1).

You can see what options are supported by the kernel module with the command below.

modinfo -p [module name]

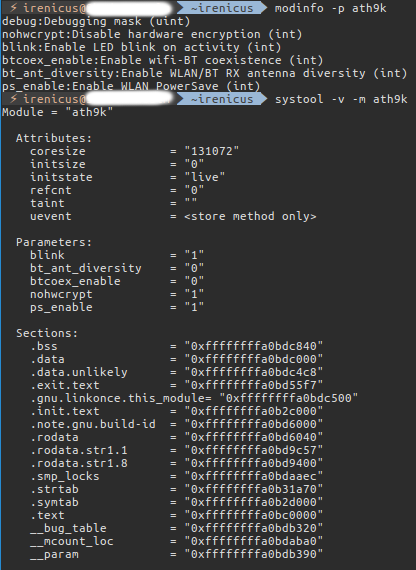
In my case, I wanted to debug my internal atheros wireless card ath9k.

To see what parameters / options are enabled / disabled by the module at the moment you can try:

systool -v -m [module name]

Selection_008

Note that in the section parameters, 1 means enabled and 0 means disabled.

By default most distributions try to have some basic module configs so that your hardware works as expected or so that some other module doesn’t interfere with your hardware by blacklisting them. But it’s not practical to predict what kind of hardware you might have and there’s so many different types of hardware, so it’s better to debug your own hardware and tune the configs to something that is optimal for you.

At the time when I was debugging my wireless card, the powersaving option was disabled (ps_enable=0) and hardware crypt was enabled (nohwcrypt=0) which is why my wireless card was using a lot of power and was slow at the same time.

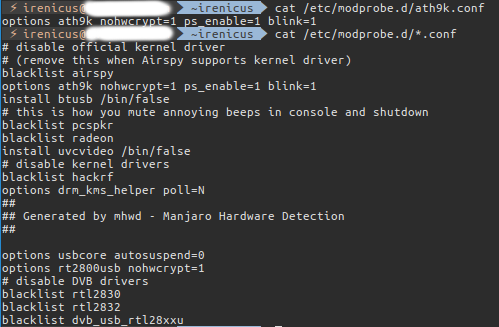
You can configure them to use the parameters that you want by writing a config file in the /etc/modprobe.d/ directory. What you name the file doesn’t matter, but it needs to have a .conf extension for it to be recognized as a config file.

Usually it’s a good practice to name the file according to the module name, in my case it’s ath9k.conf.

This is the format of how you enter the parameters in the config file:

options [module name] [parameter=value]

Selection_009

You can have multiple parameters side by side separated by space.

After the changes have been written, you can simply remove the module and reload it to have the changes implemented or a reboot works fine too like in windows 🙂

Removing module:
modprobe -r [module name]

Reloading module:
modprobe [module name]

Another thing that was interesting to learn was that let’s say there are some hardware or module that you want to disable or don’t want running.

For example, I find that I never really use the webcam and bluetooth devices on my laptop so disabling them is also a good way to save power and increase battery life.

You can blacklist modules by just having a config file with they key word blacklist followed by the module name. But in some cases, a module may be a dependency to another module and therefore blacklist feature might not work as expected and the module might end up being loaded anyway.

So to prevent that you can write the config file this way:

install [module name] /bin/false

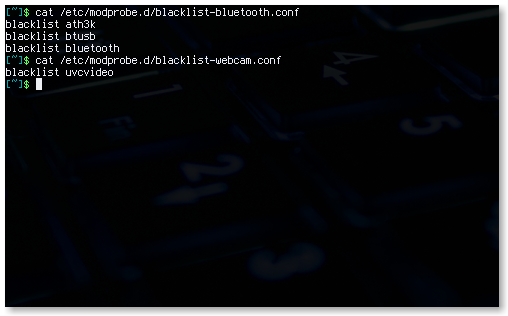
For those wondering the bluetooth module by default is btusb and webcam module being uvcvideo.

Anyway, that’s it for today. I really didn’t wanna make this post since a lot of this info can be found publicly or in Arch Wiki.

But a part of me insisted that I do since a lot of stuff I learned were by trial and error. Usually Arch Wiki tells you what to do but not why, it is up to you to figure out why and that’s the most important part of the learning process in my opinion.

Hopefully this might be helpful to some of you 🙂

Power Saving GOD Mode on Linux (Part – 2)

This is the advanced guide to Linux power saving. Advanced in the sense that I’ll walk you through the process of learning about the different modules used by your kernel; also how to apply the different power management settings supported by your hardware.

Part of the hacker mindset is to learn, explore & think outside the box which can sometimes lead you to a whole new world of opportunities & at other times can cause you trouble if you’re not careful enough 😉

Alright, so first of all you need to know the devices which are present in your system (e.g graphics card, wireless adapters, etc.) and the modules they use that support power management options.

One way find that out is to use the command: lspci -v

gpuwifi

The command shows you a lot of details but as you can see above, I’ve an integrated intel card running the kernel module i915 & the Wireless Atheros card running ath9k module.

Okay so what you need to do next is learn more about the options supported by these modules.

You can do so by using the following command: modinfo -p [module name]

In my case these are the parameters supported by the module (ath9k) used by my wireless card.

wireless

As you can see, there’s the flag ps_enable which can be activated to enable power management options. By default it’s not activated, and even when I try to enable it through powertop it doesn’t seem to work. So in order to make sure that feature works I’ve to enable it by explicitly stating it in my boot settings.

We’ll get to that part (enabling @boot settings) a bit later but first let’s see the power management options supported by my intel card.

i915

The module i915 has a lot of features but I decided to just focus on the power saving aspect of it.

As you can see there’s 4 main features (i915_enable_rc6, i915_enable_fbc, lvds_downclock, enable_pc8) that you can enable in your boot settings to make them work properly. By default some of these features are probably disabled because it is known to cause problems with certain types of hardware. Therefore you should be cautious about which feature you plan on enabling & double check to see if everything works out fine.

As you can also see in the description of these parameters, most require 1 for enabling, 0 to disable, etc. so use them accordingly.

Let’s get started on setting up these parameters on our boot settings. Personally I use grub as my bootloader which is the default bootloader on a lot of other popular distros like Ubuntu, Mint, etc.

The default location for grub cofig file on my distro is in /etc/default/grub

Open that config file in your favourite text editor make sure you have root priviledge.

Go to the line that says:

GRUB_CMDLINE_LINUX_DEFAULT

There would probably be some parameters set in that line already, but to enable our power management parameters we have to do it like this:

[module name].[module function]=value

e.g:  ath9k.ps_enable=1

Each of the supplied parameters have to be separated by space.Therefore the settings in my grub file looks like this:

GRUB_CMDLINE_LINUX_DEFAULT=”quiet intel_pstate=disable ath9k.ps_enable=1 i915.i915_enable_rc6=1 i915.lvds_downclock=1 i915.i915_enable_fbc=1 i915.semaphores=1″

After you make the changes don’t forget to use the command update-grub otherwise the parameters won’t be set.

Also as you can see from the settings in my grub config file, I’ve set the parameter intel_pstate=disable

From what I’ve heard intel_pstate driver has issues with certain processors or the implementation doesn’t really work that well for the case of power management, etc.

I’ve disabled pstate & I configured tlp to clock the speed of my cores according to the speeds that I want.

These are the configurations on my tlp config file located in /etc/default/tlp

CPU_SCALING_GOVERNOR_ON_AC=ondemand
CPU_SCALING_GOVERNOR_ON_BAT=powersave

CPU_SCALING_MIN_FREQ_ON_AC=800
CPU_SCALING_MAX_FREQ_ON_AC=3200
CPU_SCALING_MIN_FREQ_ON_BAT=800
CPU_SCALING_MAX_FREQ_ON_BAT=2000

CPU_BOOST_ON_AC=1
CPU_BOOST_ON_BAT=0

SCHED_POWERSAVE_ON_AC=0
SCHED_POWERSAVE_ON_BAT=1

I’ve set the minimum frequency of the core down to 800 & I think by default it used to be around 2000. After reboot the changes should take place & you might notice less heating or power usage from your cpu aswell.

Also currently I run 3.14 kernel (did notice slight power improvements), and having made all these changes my power usage dropped to 9W (lowest) & averaging on about 10-11W.

So that’s it for my Linux power saving guide, I hope I’ve been able to share what I’ve learned & hope that it helped some people. If I had this knowledge earlier I’d have been so much happier, would appreciate any feedback.

Thanks 🙂

Power Saving GOD Mode on Linux (Part – 1)

Some people who use Linux on a daily basis have a lot of issues configuring their system to attain the optimal power saving features supported by their hardware (mainly due to lack of experience), which is why the battery life on Linux is not even close to that on Windows. It’s not just about configuring the features, sometimes it can be due to the driver itself lacking good power management support for certain hardware.

Anyway, I’ve been looking around a LOT and finally I think I’ve achieved some of the wisdom to understand how and what to mess around with to get the most out of my laptop’s battery and I wish to share it with you! 🙂

Okay, so there’s a lot of things to look for & there are many tweaks to be made depending on your preferences & hardware. For the basic configuration it should be the same regardless of your hardware, but for advanced configuration I’ll show you the steps towards detecting & enabling the power management configurations in the kernel level manually. There’s a lot of things to write about so I’ve decided to make it into two parts. This part will only cover the basics, on the next part I hope to cover the advanced configuration stuff.


Basic Configuration:

First of all, there’s 2 main utilities on Linux that are out there which automatically optimises your hardware settings for power management depending on whether your laptop is plugged to a power source or not.

1) TLP (https://wiki.archlinux.org/index.php/TLP)

2) Laptop-mode-tools (https://wiki.archlinux.org/index.php/Laptop_Mode_Tools)

You have to choose one of the above tools but not both as they conflict with each other. I personally would recommend going with TLP as it has good power management defaults & it automatically does all the things for you where as in laptop mode you would have to configure the settings manually before you can start using it. Which can be quite time consuming but it’s upto you. Please follow the steps in the wiki accordingly, and also note that in case of tlp or laptop-mode you may need to add usb device hardware id’s (for stuff like a mouse, etc.) in the configuration file to make sure they work after your laptop is unplugged from the power source.


After installing and configuring one of the above tools, I’d recommend installing Powertop (https://wiki.archlinux.org/index.php/powertop)

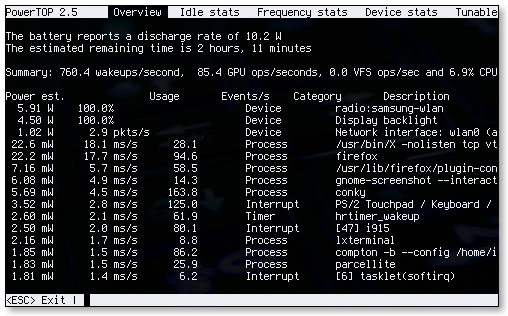
Powertop is the main tool that you rely on to get statistics about your laptop’s power usage.

With this utility you get to see which device is using how much Watt of power.

powertop1


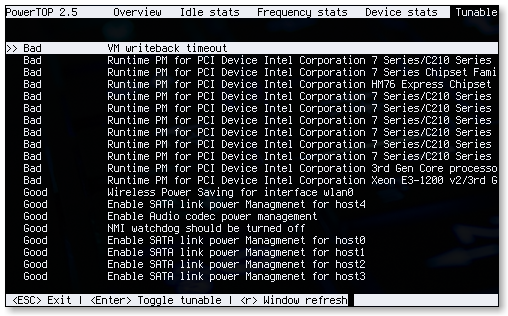
You can even enable some power management settings for your hardware from within powertop if they’re not enabled already.

powertop2


For me personally, since I’m paranoid about security, I blacklisted the bluetooth and webcam modules completely so that they don’t load at boot by any chance as I don’t use those services anyway. That’s also a good way to save up on power. If you’re on systemd, you can create a file in /etc/modprobe.d/ with the following details to do the same.

blacklist


Next we move on to CPU related stuff, install Thermald from your package manager & enable it on boot time.

Thermald is a Linux daemon used to prevent the overheating of platforms. This daemon monitors temperature and applies compensation using available cooling methods. You can find further information on cpu power saving on the wiki: https://wiki.archlinux.org/index.php/CPU_frequency_scaling


Also laptops these days come up with different types of discrete cards from Nvidia to Radeon & the drivers you decide to use will also impact your battery life. Personally for me I find the use of discrete cards like Radeon unnecessary as I don’t do gaming on laptops. So I’ve also disabled the discrete card at boot time, running only the internal intel card to save power and it reduces the heat aswell keeping your laptop cool at all times. You can do the same by following this guide: https://wiki.archlinux.org/index.php/hybrid_graphics#Fully_Power_Down_Discrete_GPU


Finally, there’s this full run down of everything that I’ve covered in Arch wiki which you can use as a reference: https://wiki.archlinux.org/index.php/Power_saving


Personally, after applying all the configuration changes the power usage on my laptop dropped from somewhere around 16-20W to about 11-14W. That my friend is a major drop in power usage. Usually I used to have a discrete card running at all times & due to lack of a working driver (new card) it used to run in the background without even being used resulting in such high power usage. Now I’ve finally been able to power down the GPU & thus my battery life has been extended from somewhere around 1-1.5 hr to 2.5-3 hours and best of all it’s cool at all times.


In the next part we discuss in details some of the advanced aspects of power saving I mentioned earlier & it can also boost your battery life quite significantly depending on your hardware, etc.

Manjaro Linux Review

I have distro hopped like a grass hopper in my early years as a Linux user. I’ve tried different variants of Linux & one of the things that I’ve realised is that even though overall eye candy does matter, but what matters more in the longterm is your hardware compatibility, familiarity with the distro and how well it suits the flow of your work.

They say if it works, don’t try to fix it & thus we have distros like Arch and Gentoo. Gentoo is the type of distro that not only requires pure commitment and dedication, but you also need a lot of patience to go through hours of frustrating compilation process. The end result being that all your software is optimised according to your architecture; in non-geek terms it means that your computer would pretty much run the fastest it can run and more. It’s like replacing the Toyota engine of your car with that of a Ferrari. Who wouldn’t want the extra speed right? Only if you knew how painful the actual process is.

Anyway, Arch on the other hand has prebuilt binaries optimised for your architecture which is similar to that of Gentoo but the upside being that there’s no compilation process therefore it’s much faster to get things setup. With Arch you’ll have to start from scratch and go through a big book full of instructions on how to set it up and running according to your taste. Nothing impossible, purely do-able but you need the time & energy to troubleshoot your own hardware, software & driver issues along the way. Don’t get me wrong, I love these distros because they give you total control over how you want your perfect system to be like but I’m certainly not the kind of guy that’d wait 10+ hours just to get my system to a usable state. Therefore we have a distro called Manjaro Linux on for review today!

First of all, I’m a big fan of openbox window manager. It’s sleek, fast & totally customisable. Also I do like Arch but due to time constraint never really bothered to give it a full try.

What Manjaro Linux brings to the table is that its based on Arch Linux but it comes out of the box as a minimal install (not as bloated as Ubuntu) on which you can further customise and tune according to your taste. It brings all the goodies of arch like the keep it simple philosophy, consistent & simple bloat free architecture and most important of all user friendliness with a lot of built in scripts to assist the user in customising look & feel. So basically you get an Arch system for free without having to break a sweat.

Manjaro Linux comes in various flavors like Openbox, Kde, Mate, etc. but for now I’m going to keep this review relevant only to Openbox. The best openbox distro that I’ve used in the past is Crunchbang, and it’s really good. But what Manjaro Linux gives you is access to more up to date, bleeding edge software, increased computer performance, ability to update & switch kernels on the fly (built in scripts) & the impressive amount of documentation. I was also pleasantly surprised to see a step by step instruction manual regarding the process of installation on Manjaro (in the form of pdf), detailed with screenshots. Seems like they’ve really put up a lot of effort in trying to make it look more professional and easy to use.

TLDR; here are the things that I like about Manjaro Linux:

– Fast, simple & based on Arch Linux.

– Stable repositories. You gain access to Arch repos & a lot of tests are done to ensure that the update doesn’t break anything before it’s released on Manjaro servers.

– Built in scripts like mhwd, mhwd-gpu, mhwd-kernel ensure that you’re uptodate with the latest kernel or drivers for your graphics card & you can opt to change to different versions as you see fit.

– Openbox install comes preinstalled with all the necessary scripts, themes & customisations to just get you started without starting from a plain vanilla install.

– Big community of active users who are constantly working on fixing old scripts, creating new ones & making your Manjaro better.

– Good forum support for Manjaro users via their official forum. Documentation from Arch can also be used as a reference material to troubleshoot your problem as there’s similarity between both distros.

Things that I’d like to see improved in Manjaro:

– Video tutorials series detailing how to get certain things done as Manjaro has a strong focus on beginner Linux users.

– More customisation options for Openbox like which screensaver, login manager, etc. you’d like to install. Also it’d be nice if there’s an option to turn on some composition (compton) with fade effect & transparency by default.

– More marketing to get the message across about Manjaro, it doesn’t get as much publicity as let’s say Ubuntu.

Here’s a link to my new Manjaro install, see how it looks like:

http://irenicus09.deviantart.com/art/Manjaro-Linux-437550988

Overall, I’m really impressed with Manjaro Linux & I’ve never seen a distro so focused towards beginner Linux users. They’ve done a great job at it & if I were to recommend a distro to my friends or family this would be it. Certainly worth giving a try if you haven’t already 🙂

Reason why Linux is not main stream yet…

Alright, I wanted to talk about a lot of the things that have been bugging me lately. This post is totally my personal opinion and is based off on my experience with GNU/Linux.

First of all, let me tell you that I’ve personally tried various distributions (distros) of Linux…from Ubuntu to Gentoo, Fedora, Arch and every thing in between but I don’t consider myself an expert. This post highlights what I think is wrong with the GNU/Linux in general and what can be improved to make it more appealing to the end users.

The various distributions of Linux that I’ve tried are quite similar in nature, they have a lot of the commonalities like the kernel, the architecture and software that run on it but they vary based on the philosophy among their communities, their vision, their goals, their package managers, etc.

For example Gentoo’s philosophy is that it’s a source based distribution where you have to compile everything from source where as others like Ubuntu rely mainly on binary builds.

Anyway that’s not what I wanted to talk about. What I’m trying to highlight here is that a lot of the things that we do in the Linux world is just too damn complicated for a typical end user to go through.

For example, I bought a new laptop eight months ago and it came with a proprietary AMD Radeon HD 8750m card with dual switchable graphics. When I bought it I didn’t expect the card to work at all since it’s so new. But recently I realised that the support for this card is available in the newer 3.11 kernel which allows dynamic power management to improve battery life and decrease heating, etc.

Therefore I decided to install the latest kernel for which I had to use a script (smxi on Debian) to get it installed. Even after installing the kernel, next issue was that I had to enable dynamic power management (dpm) in the boot settings (grub) manually as it was disabled by default. Then again it didn’t work because I was missing some firmware or because I had to disable the proprietary intel driver and load the radeon driver manually. Or may be because of something else that I need to spend time experimenting.

My point is that a typical end user shouldn’t be worrying about these kinds of stuff. In the Linux world we expect the user to be able to manage and handle these kinds of stuff. We assume they have some knowledge of bash, terminal navigation or even programming skills.

In contrast, the Windows or MacOSX world is like handing the end users freshly baked cakes out of the oven. They don’t need to know anything about baking power or the ingredients that goes into it, they don’t need to worry about the correct temperature in the oven….they just enjoy their freshly baked cakes.

That is the reason why I think people (general population) are unlikely to come over to Linux anytime in the future except for hobbyists, geeks and people who need to run Linux for their day jobs. But I can not totally disregard the effort distros like Ubuntu have been putting in….to make a big impact in the department of user friendliness, making all these subtle things that is so hard for a normal Windows user….fade away. So I should obviously give props to them for trying to make Linux go in that direction.

But still, from my last experience with Ubuntu 12.04 there’s a lot of things I didn’t like….let me start off with the Zeitgist and online search bullshit. Whenever you search on the dash, your search results get sent off directly to Ubuntu servers and that is turned on by default! Talk about privacy…..next thing they had was this Geo-location service thing going on and from what I’ve read on Ubuntu forums itself…when your computer boots off it tries to ping Ubuntu server or something similar even while you’re not logged in. So ya that totally turned me off.

Anyway there’s still hope that Linux can make it to the main stream in the Desktop world if SteamOS can be a big hit. Valve is a pretty resourceful, reputable company and the steam platform itself has hundreds and thousand of AAA titles. If they can somehow make all these subtle things in Linux that we have to deal with every day go away and make Linux more usable then I think people can be convinced to switch over to Linux after all.

Don’t get me wrong, I love Linux and use it on a daily basis….but I simply think that it’s not for everyone yet. At my University, I even opted for teaching a Linux course as a term project in order to get more people interested in Linux. From that teaching experience, although there were a handful of students…..what impressed me the most was that even people with no prior experience with Linux were able to grasp things so easily and fast. If I imagine my personal experience with Linux itself…it took me a whole lot longer than that to get the hang of things. Perhaps it was because they had programming experience or IT background etc.  but as of yet I can not confidently go to someone who has zero knowledge of Linux and recommend that person to switch over to Linux. In my opinion they’re better off with their freshly baked cakes.

Openbox Review

For quite a long time I was looking for a light weight window manager or even a full featured desktop environment to switch to from Gnome 3. Personally, I have nothing against Gnome 3…after having used it for quite a while I do see where it´s headed and I do think it´s going in the right direction with user friendliness, innovation, etc. but as a Linux user and having used Linux for a few years now I feel like all of these features are just too much for me, perhaps even unnecessary. Not to mention that my old laptop which I currently seem to use as my production machine seems to be limited by it´s ram (1 GB) and running gnome3 on top of that doesn´t leave with much resources to use with other applications if need be.

Therefore, a few days back I decided to give Openbox a try and take a break from Gnome-3, and I must say it was worth it! 🙂

First of all, I started with reading documentation related to Openbox, directly from Openbox Wiki & Gentoo Wiki on Openbox…and for the most part they have an in-depth guide that pretty much allows you to configure everything related to Openbox.

After having used Openbox, I found it to be really simple, flexible, customisable, lightweight and obviously fast! You can pretty much feel the difference in speed between Gnome3 vs Openbox, itś like comparing Toyota vs Lamborghini 😛

Anyway I don´t wish to bash Gnome-3 anymore, it does deserve credit for whatever it´s trying to achieve with user friendliness and I think it is a necessity.

As for me, I´m now a permanent Openbox fan…checkout the screenshot 🙂

Link @full size: http://i.minus.com/iRt74ggjdopjJ.png

So what do you guys think? Feel free to leave your suggestions, comments behind! Thanks 🙂

Laptop power saving on Linux

Hi guys, recently after coming back to my country over summer holidays I’ve been really frustrated with all the daily power-cuts (yes, I’m from a third world country).

So I decided to research some cool tools for Linux that would help conserve power on my laptop.

First of all, how is power usually conserved on a laptop? Without the use of utilities, if we use logic it’s pretty obvious…we can manually lower the screen’s brightness and set it to a minimum at the same time we can turn off audio completely and I think that would help a lot in conserving power. But beyond that what other stuff can be done to conserve power on our Linux system that perhaps we are not aware of? Well that’s one of the reasons these power saving utilities exist, so let’s investigate.

Today I’ll discuss my personal favorite power saving utility, it’s called “laptop-mode“. The name fits it’s purpose right? 🙂

It is a commandline based utility and the best thing about this utility is that it takes care of handling everything on the fly…everything from auto disabling unused USB devices/ports to scaling down CPU frequency…to lowering hard-drive spinning rates, etc. is dynamically adjusted when you plug in/out of power.

Also it comes with a really well documented, simple configuration file located in “/etc/laptop-mode/laptop-mode.conf” which you can change to adjust how you want to manage your power.

Usually, before using laptop-mode I had approximately 1.5 hrs  of battery life on my old laptop provided brightness & sound was set to a minimum. But after using laptop-mode & under the same condition it seems that my laptop power lasts for approximately 2.5 hours…an hour more saved! That is something isn’t it? 🙂

So how can you get your hands on laptop-mode? Search for it in your package manager and I’m pretty sure it is available, if not then perhaps you might look for it’s source & compile it manually.

As for me, everything is available on the land of Gentoo:

Well how does it save power you may ask? Well just look at the list below:

* ac97-powersave
* cpufreq
* dpms-standby
* eee-superhe
* ethernet
* exec-commands
* hal-polling
* hdparm
* intel-hda-powersave
* intel-sata-powermgmt
* nmi-watchdog
* runtime-pm
* sched-mc-power-savings
* sched-smt-power-savings
* terminal-blanking
* usb-autosuspend
* wireless-ipw-power
* wireless-iwl-power
* wireless-power

That list has been taken directly from my configuration and perhaps it is generated according to my laptop’s hardware.

Another good utility to look out for is “powertop“. It’s similar to laptop-mode with similar features but the only disadvantage that I can think of is that it doesn’t dynamically switch between power saving modes or remember your power saving settings so you may need to manually enable/disable various options from it’s commandline, menu driven program which I think is quite annoying.

Anyway that’s about it from me, hope this post has helped you in your quest for conserving power!

Also please leave some feedback if this post was useful to you and do let me know if you know of any better ways to save power.

Commandline Based Music Player

Sup guys,

Quite recently I was having a lot of issues with my favorite music player – Banshee, it’s kind of laggy on my underpowered laptop but also all of a sudden there’s this bug that makes the GUI interface totally unresponsive so I decided to look at other options.

All the other options like Rhythmbox, Amarok, Audacious for some reason didn’t quite fit what I was looking for so I decided to research for a commandline based Music player & only then I stumbled upon CMUS.

http://cmus.sourceforge.net/

This is how it looks like:

The main thing I was looking for in a music player was that it had to use minimal resources & CMUS does exactly that since it’s terminal based & has no GUI interface. It utilizes ncurses library to interact with user & I think it’s quite user friendly too, it’s quite similar to IRSSI (cmdline based IRC client).

But the main feature of CMUS is that it’s quite customisable and it’s configurations can be easily edited similar to the cmdline based editor Vim. It has all the features I was looking for from a music player like Banshee & interestingly there’s also a plugin called last-cmus that allows you to scrobble tracks to lastfm – http://code.google.com/p/last-cmus/

So far I’m quite satisfied with CMUS and I don’t think I’ll be switching to anything else anytime soon.

Anyway, if you are a CMUS user feel free to share what you think about it! 🙂